

SUPPLIER PORTAL MANUAL
–View/Download as PDF
CONTENTS
I- REGISTERING FOR YOUR SUPPLIER PORTAL ACCOUNT
II- FIRST TIME LOG-IN
III – WELCOME SCREEN
III.1 – Top Menu Bar
III.2 – Quick Create Links
III.3 – The Supplier Portal Menu
III.3.1 – Check-In
III.3.2 – Take Action
III.3.3 – Administer
IV. YOUR DASHBOARD
V. YOUR COMPANY FILE
VI. LOAD LOCATIONS
VI.1 Your Load Locations Home Screen
VI.2 Adding a Load Location to your Company File
VII. LOADS
VII.1 Your Loads Home Screen
VII.2 Loads Summary Screen
VII.3 Loads Detail Screen
VIII. Scheduling a New Load
VIII.1 Quick Link for Load Scheduling
VIII.2 Full-Form Load Scheduling
IX. VIEWING AND REPORTING ON HISTORICAL LOADS
I. REGISTERING FOR YOUR SUPPLIER PORTAL ACCOUNT
Are you currently a Benarix Supplier? If so you may sign-up / register for your supplier portal account here.
A Benarix Account Manager will review your application and get back to you via e-mail regarding your application. Once you’re approved, you’ll be able to sign-in and manage your accounts, create loading locations, schedule loads, keep track of shipments and more!
How To:
- Go to the Benarix Portal Registration Page.
- Enter your Name, Company Details and other information as best you can. Don’t worry if you don’t know your ISCC number. We will be contacting you on the e-mail address you provide us so make sure you enter the information correctly!
- You will receive your account activation notification within 48 hours.
- You may now sign-in to your Benarix Portal account and create loading locations, schedule loads and manage your account.
II. FIRST TIME LOG-IN
After you log in for the first time, verify that you’ve entered the correct information.
Visit the following pages and make sure your data and details are correct:
- Your personal information (name,phone and e-mail)
- Your company information.
- Your default loading location.
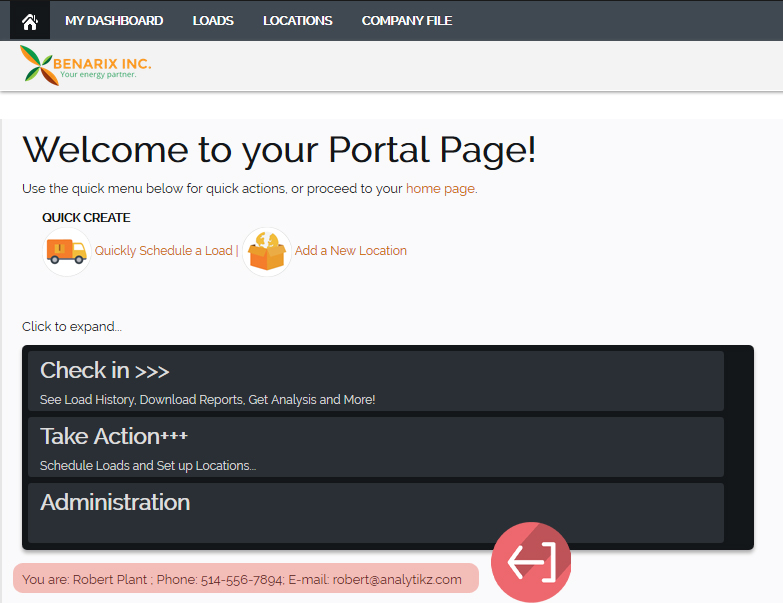
HOME PAGE STRUCTURE
You’ll notice a couple of things. First your Home Page is divided into three sections:
- Top Menu Bar
- Access Top Level Functions
- Quick Action Links
- Here you’ll be able to schedule loads and add load locations for pick-up through a simple pop-up.
- The Supplier Portal Menu
- Access all your history, customer information and execute any tasks you need through the expandable menu.
Keep reading III. WELCOME PAGE STRUCTURE to find out more.
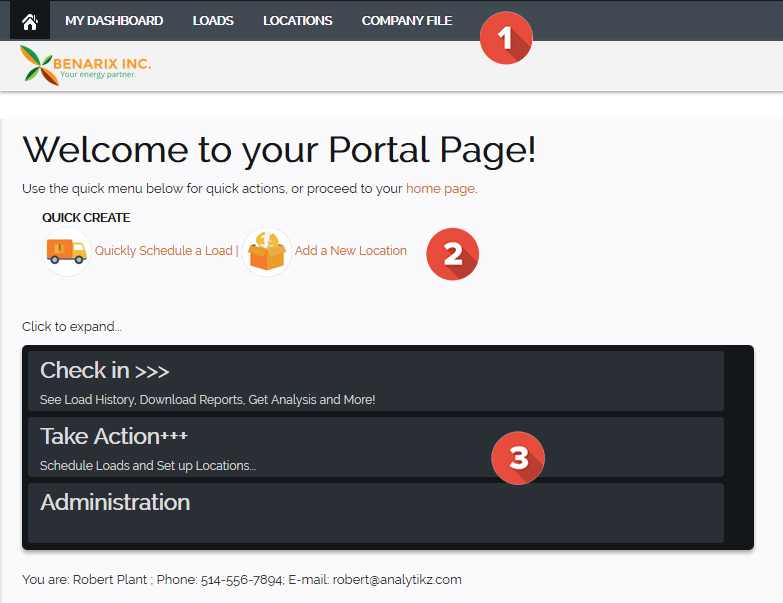
III. WELCOME PAGE STRUCTURE
NOTE: You can always use your toolbar to navigate directly to pages/tasks you need. | Use the ‘home’ icon to get back home to your welcome screen.

STRUCTURE
Your Home Page is divided into three sections:
- Top Menu Bar
- Access Top Level Functions (Dashboard, Loads, Locations, Reporting, etc.)
- Quick Action Links
- Quick Links for Creating New Loads & Locations
- Here you’ll be able to schedule loads and add load locations for pick-up through a simple pop-up. Only the basic information will be asked. You can fill in the details later.

- The Supplier Portal Menu
- Access all your history, customer information and execute any tasks you need through the expandable menu.
- Here you are provided with a more comprehensive menu to view, edit, report, analyze all your loads history with us. You’ll be able to filter your reports by location and date if you need to.
III.1 Top Menu Bar
Access Top Level Functions
- Dashboard
- Pre-built, customizable widgets according to your needs for dashboard reporting on your loads and history with us:
- Load Funnel,
- Collection Pipeline
- Revenue by Location
- Top Loads
- Loads by Stage
- Upcoming Activities (scheduled loads, Updates, Tracking)
- Pre-built, customizable widgets according to your needs for dashboard reporting on your loads and history with us:
- Loads
- Schedule a Load, View Previous Loads, Pull Reports on Historical Loads, Filter results by date, location and more!
- Locations
- See your Locations activities history. Add new locations and update existing load locations.
- Company File
- View/Edit your Company Account file.
- Documents
- Manage Loads documents.
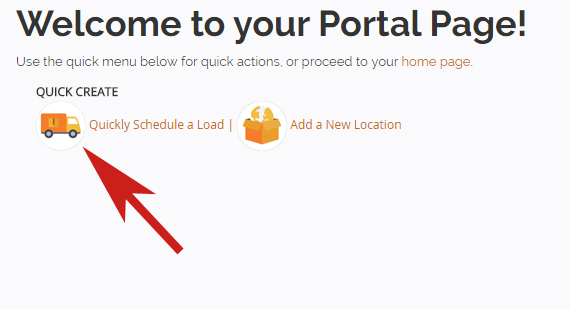
III.2 Quick Action Links
These links allow you to (1) schedule loads and (2) add load locations quickly.
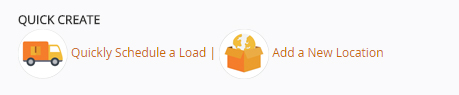
Here you’ll be able to schedule loads and add load locations for pick-up through a simple pop-up. Only the basic information will be asked. You can fill in the details later.
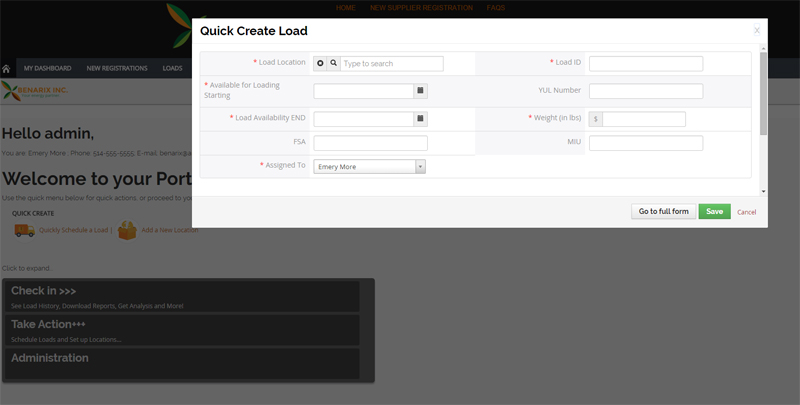
Click here and the system provides you with a pop-up with the basic information will need to schedule a load for you:
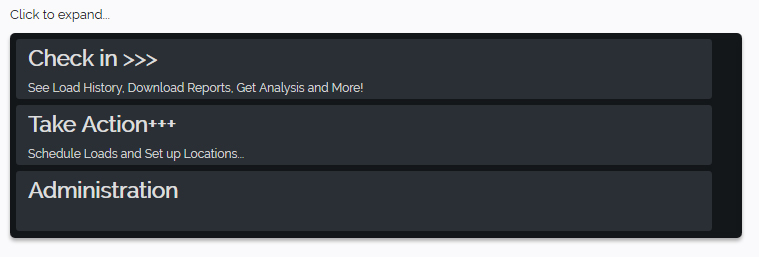
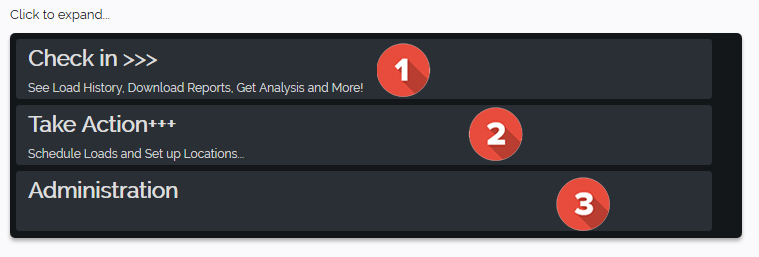
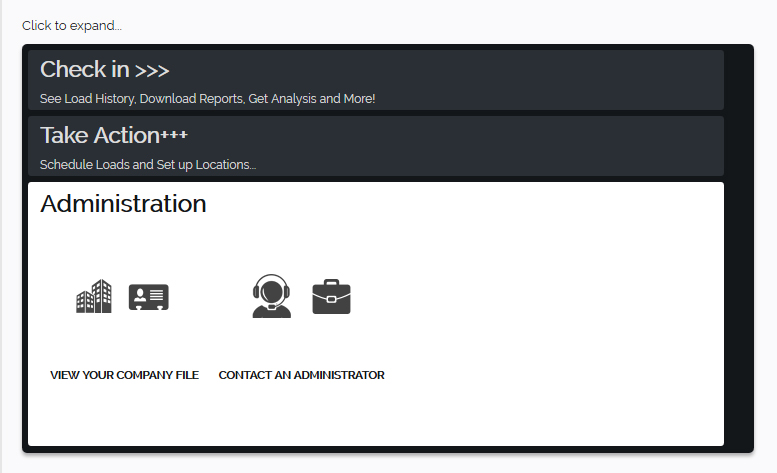
III.3 The Supplier Portal Menu
Your Supplier Portal Menu is divided into three categories:
- CHECK-IN (Verifications / Reporting)
- TAKE ACTION (Schedule Loads, Add Pick-Up Locations)
- ADMINISTRATION (View your Company File, Contact Benarix administration)
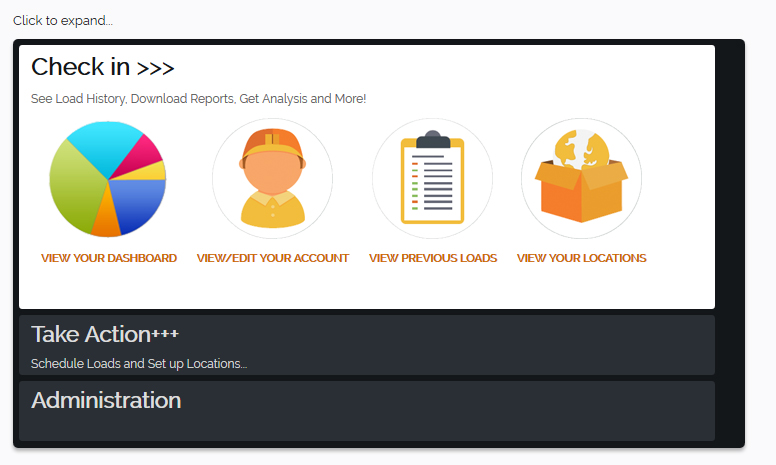
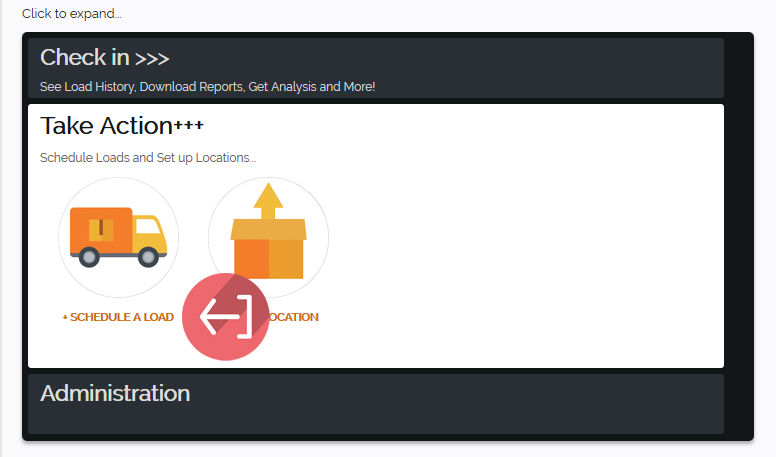
III.3.1 Check-In
1. CHECK-IN (Verifications / Reporting)
Here you will be able to pull records, get consolidated reporting and track loads currently in progress. You will also be able to add/manage load locations and facility information:
- See your dashboard with graphic reporting tools you can customize to your needs!
- View and edit your portal account information.
- View your previous loads, generate reports and export historical data.
- View/Edit your current list of load locations. Specify/review facility information.
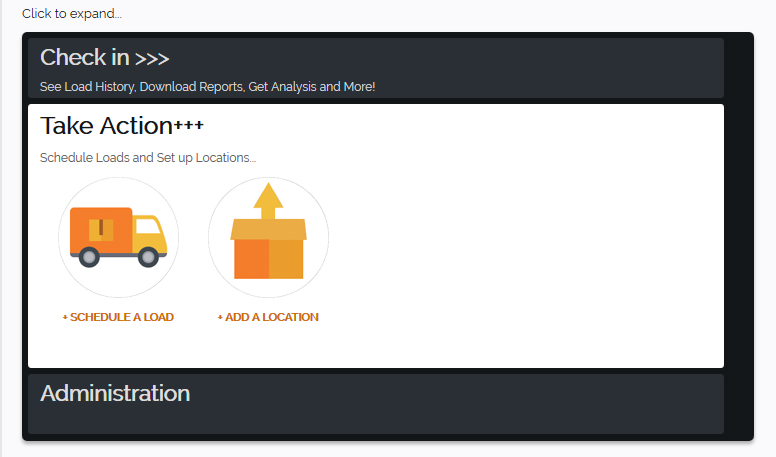
III.3.2 Take Action
2. TAKE ACTION (Schedule Loads, Add Pick-Up Locations)
Here is where you take action. You can schedule loads and/or add a new location.
- Request a load pick-up and specify load data directly into your portal account.
- Add a new location for a load pick-up request.
III.3.3 Administer
3. Administration
Manage your portal account information and more.
 IV. YOUR DASHBOARD
Your dashboard contains consolidated reporting tools on your loads and history with Benarix. You can access it at any time via the tool bar by selecting “MY DASHBOARD” or via your Check-In Menu at “VIEW YOUR DASHBOARD“:
Get instant customized reporting on your loads and business operations with us. Customize your dashboard to suit your exact needs by adding or removing widgets, setting up and configuring automatic reporting.

Insert pre-built widgets and customize them according to your needs:
- Load Funnel,
- Collection Pipeline
- Revenue by Location
- Top Loads
Loads by Stage (what are the load stages) - Upcoming Activities (scheduled loads, Updates, Tracking)
 V. YOUR COMPANY FILE
NOTE: Your company file contains all your corporate and billing information. You may have one company account and many different locations. Remember to keep them distinct!
A ‘LOCATION‘ can be any physical address you want us to pick-up a load from. Your Company File should designate your company headquarters.
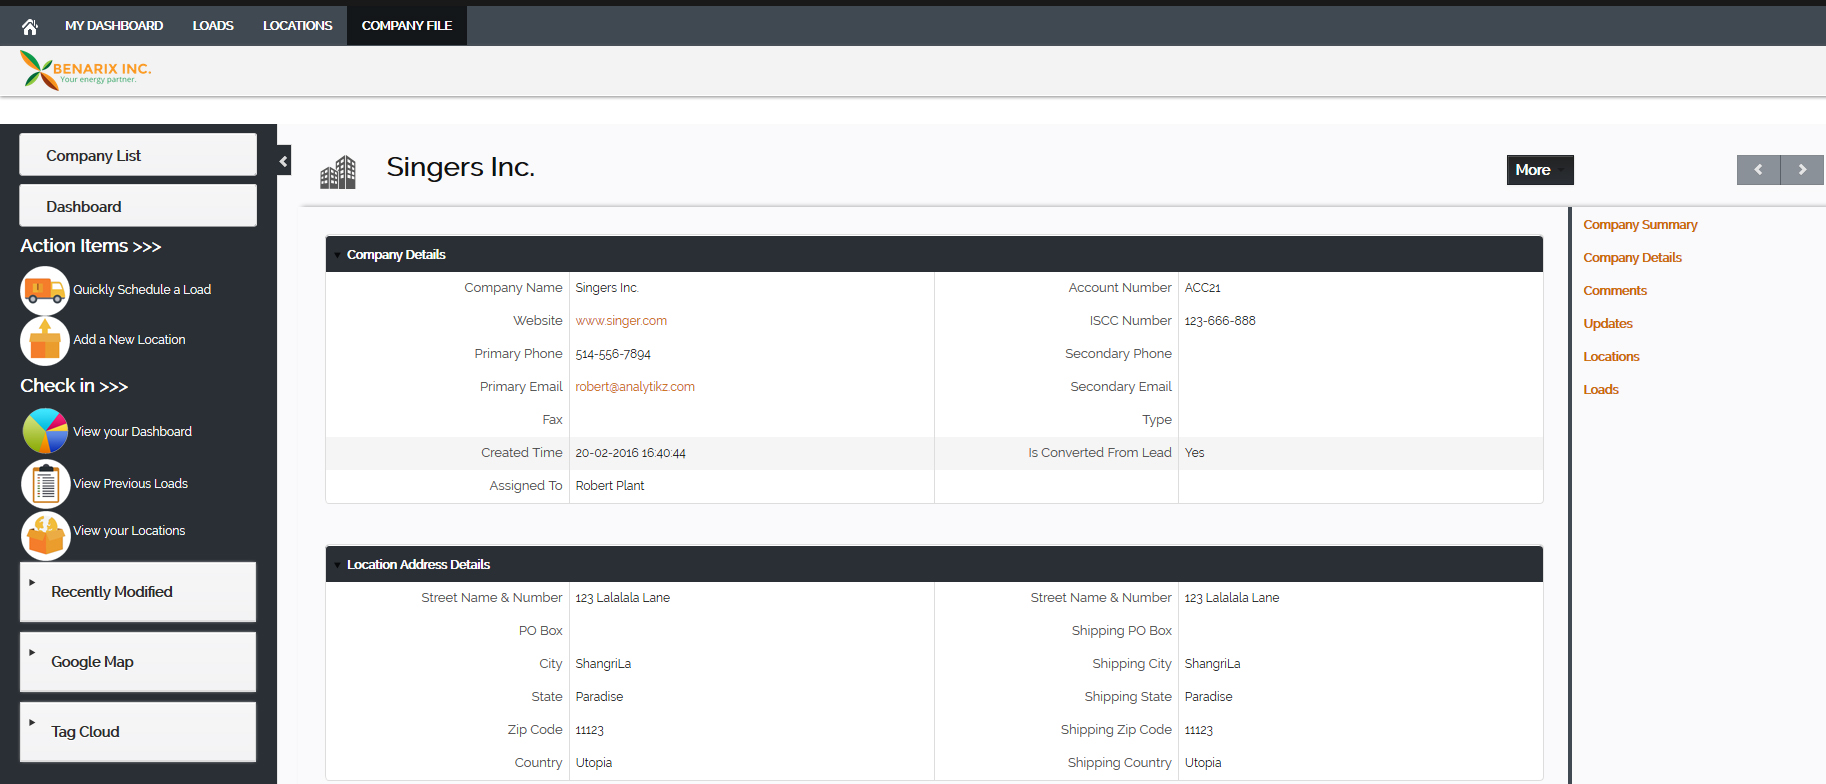
Along with address and contact information, you may specify additional information such as:
- Corporate Name
- Website
- Primary Phone
- Fax
- Primary Email
- Type : Whether you are a
- Producer / Manufacturer; or
- Broker / Agent
- ISCC Number
 VI. LOAD LOCATIONS
Load Facilities are physical establishments where loads are effected. Load Locations have a number of important physical characteristics that you’ll need to specify so that we can serve you better:
- Physical Address of your Load Location
- The type(s) of material available at this location:
- Used Cooking Oil, Yellow Grease, Beef Tallow, Chicken Fat, Vegetable Oil or Other
- The Storage Capacity (in pounds) of the facility
- Whether the Facility is equipped with a:
- Pump
- Scale
NOTE: Because most of our supplier’s load locations are also their company address, your company address is automatically entered as a Load Location.
First you’ll need to specify the address and the contact manager (if other than yourself) for the load facility location.
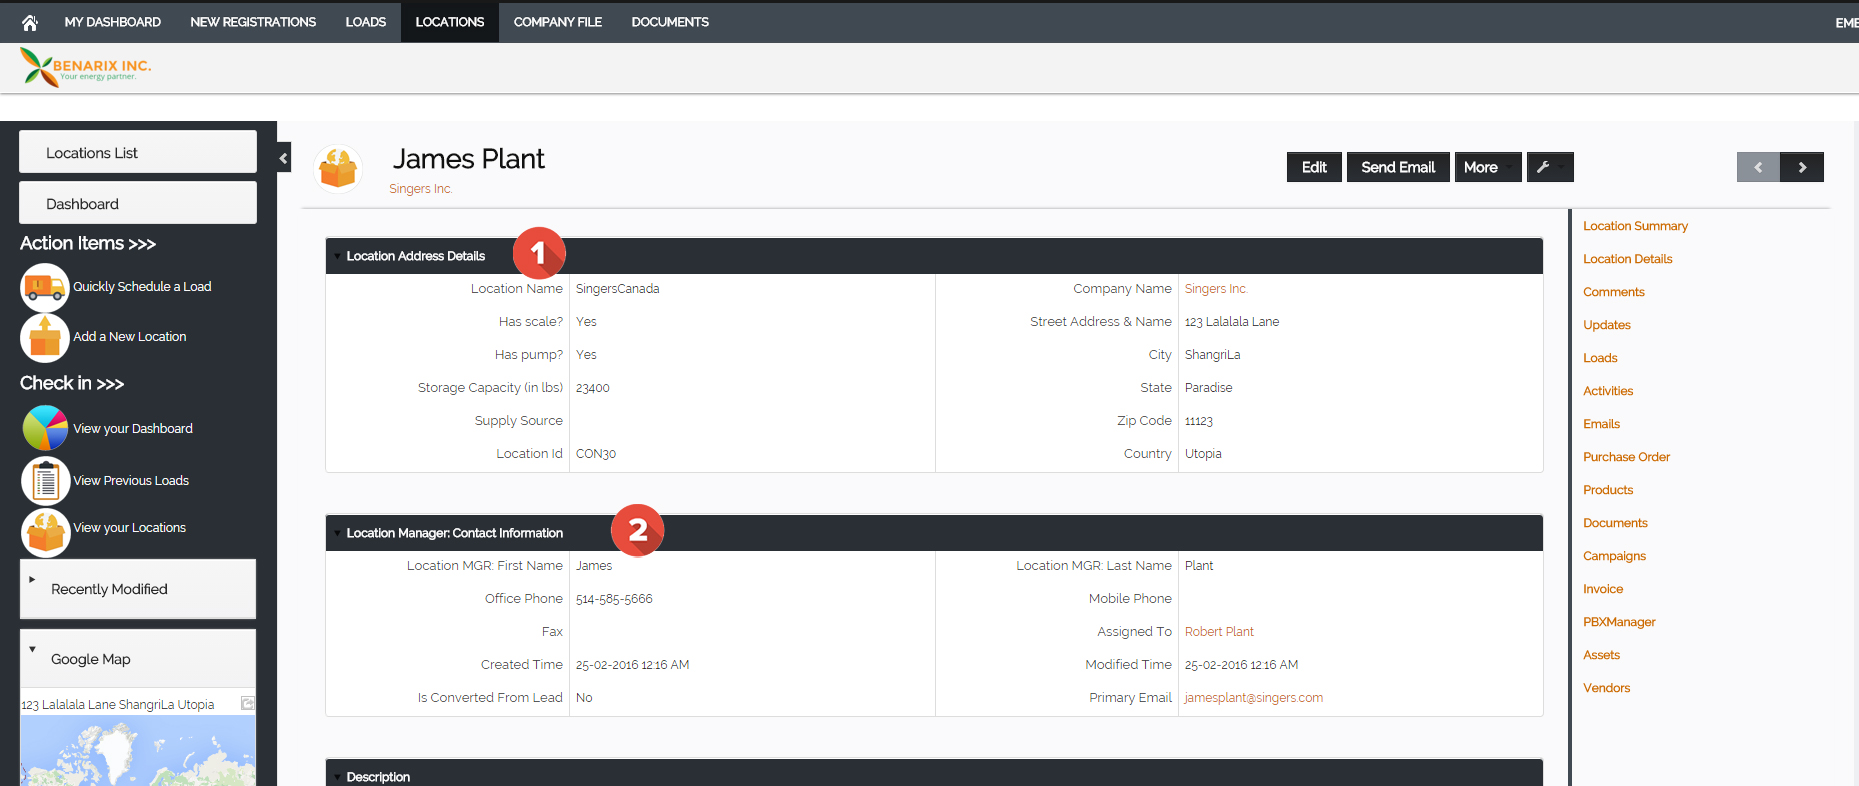
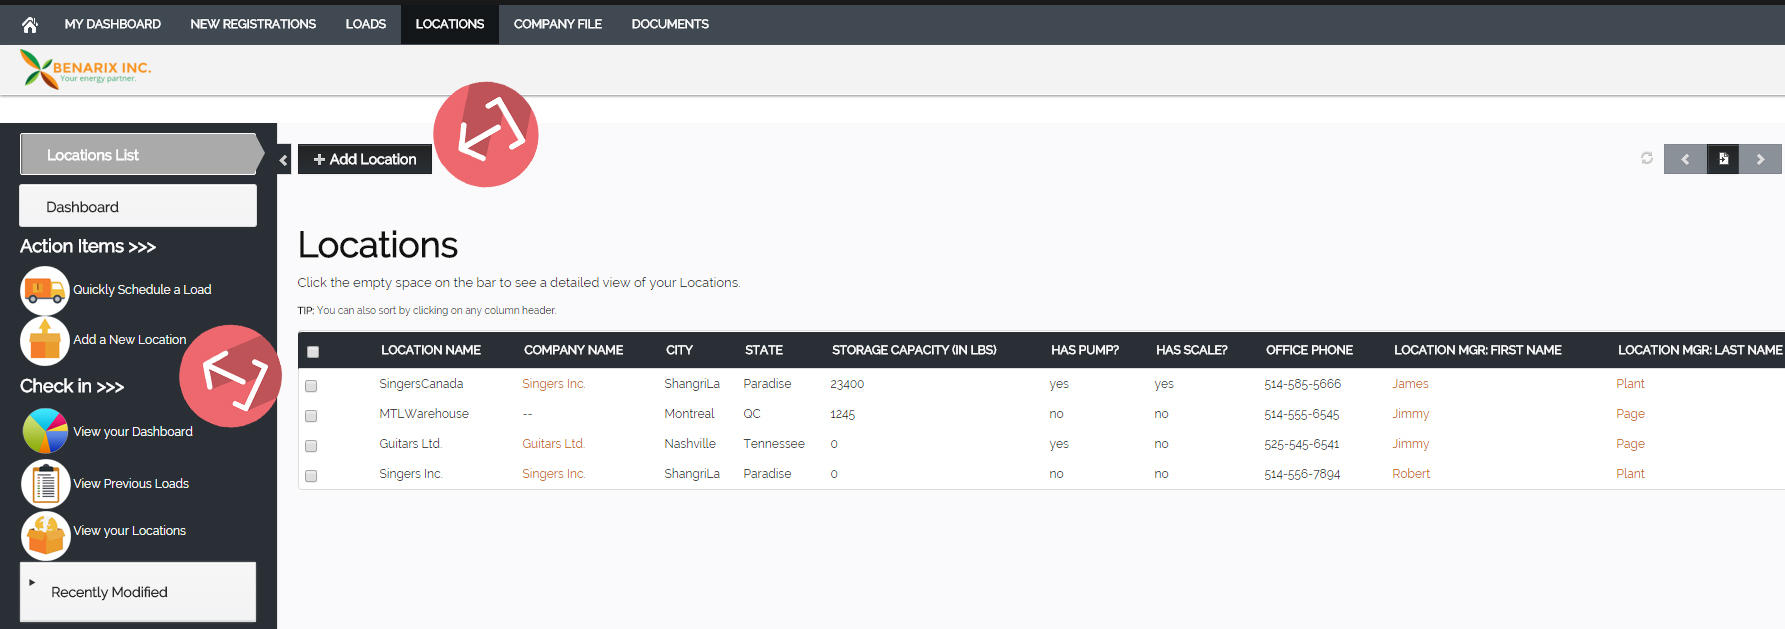
VI.1 Your LOAD LOCATIONS Screen:
Your Load Locations Screen contains detailed information on your separate Load Locations. Here you’ll be able to create, edit and build reports on all the load locations in your company file.
The information is divided into 2 tabs:
- The Location’s Physical Address Details
- The Location Manager’s Contact Details
VI.2 Adding a Load Location to your Company File:
A Location is a facility where the load is effected. Some of our customers have multiple load locations. You can add, remove, edit your company locations.
- Sign-in to your Benarix portal account.
- You can add a LOAD LOCATION by selecting “Locations” from the Top Menu. A List of your Locations will be presented. Hit the “+Add a Location” button at the top of the page. (Next to the “Actions” button);
- OR, Simply click the “Add a Location” icon in your “Action” menu on your welcome screen:

- You will be redirected to the “Creating New Location” page.
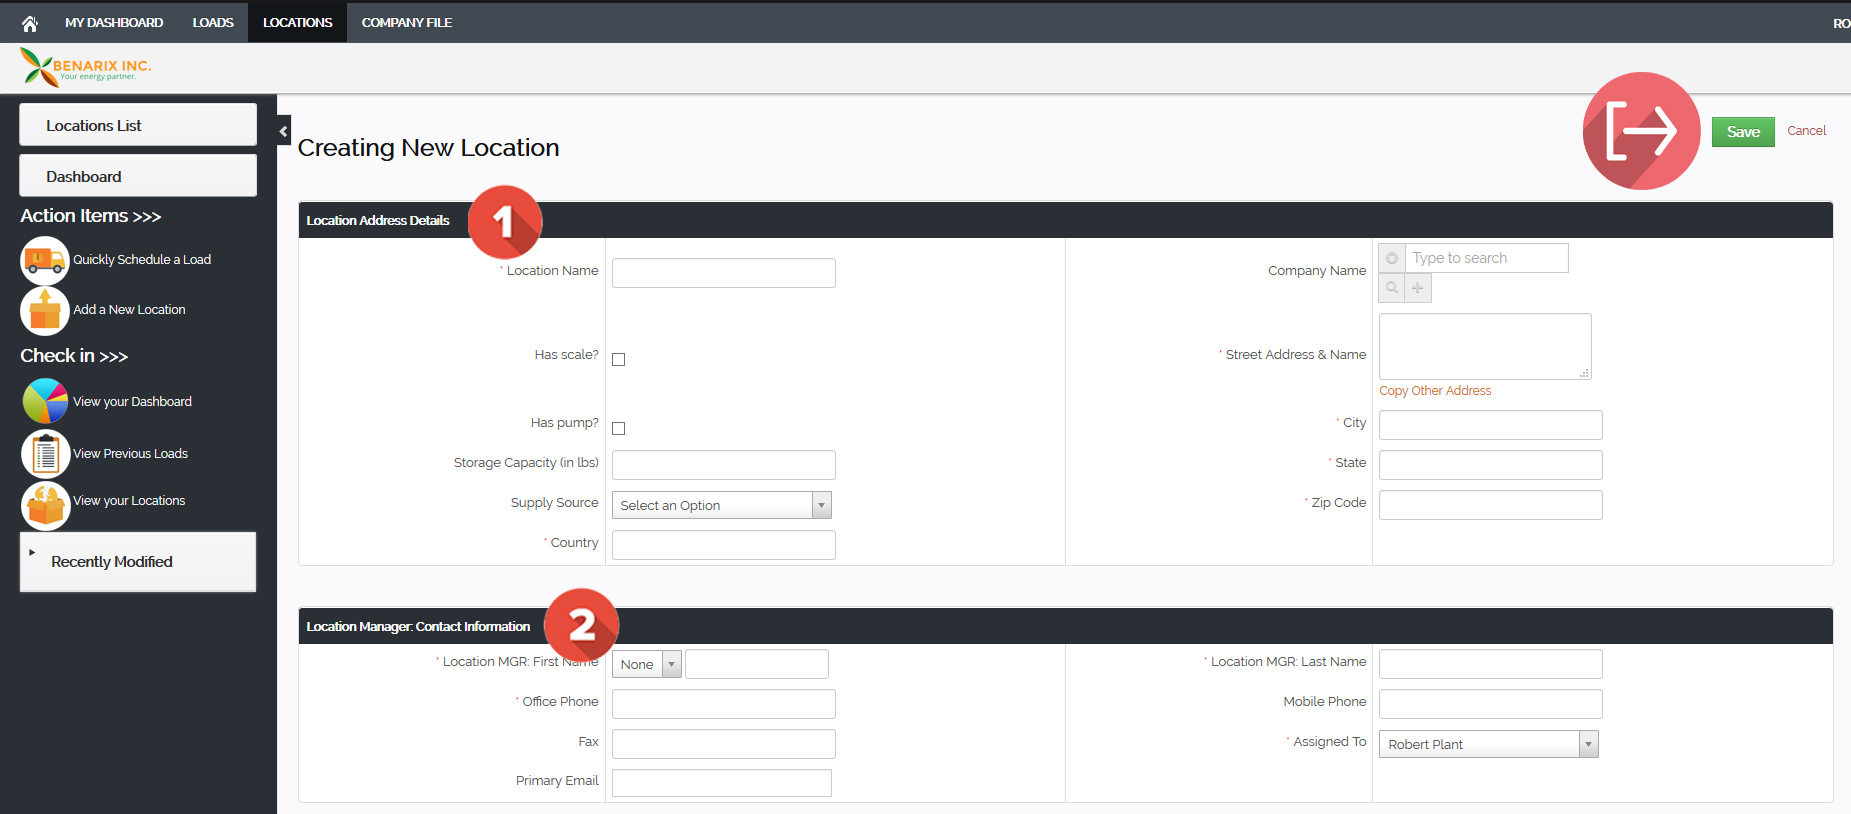
- You will enter information into two sections:
- Address information for the New Location;
- Information for the Contact / Manager at the New Location.
- Entering Location Address Details
In the Location Address Details tab, you will enter:- Location Street Address, City, State, Postal Code and Country.
- Entering Information for the Contact / Manager at the New Location
In the Location Manager: Contact Information Tab, you will enter:- the First Name of the Contact / Manager
- the Last Name of the Contact / Manager
- the Location phone number.
- the Manager’s Mobile number if you have it.
- the Fax number if available.
- Choose your Account from the “Supplier Name” drop-down menu.
- You can choose a default Supply Source for this Location by selecting the type of material loaded in “Supply Source”.
- You may add a photo and a description of the site…
- When Done, hit “Save”.
- Your Location is now in the system and available for Load Scheduling.
 VII. LOADS
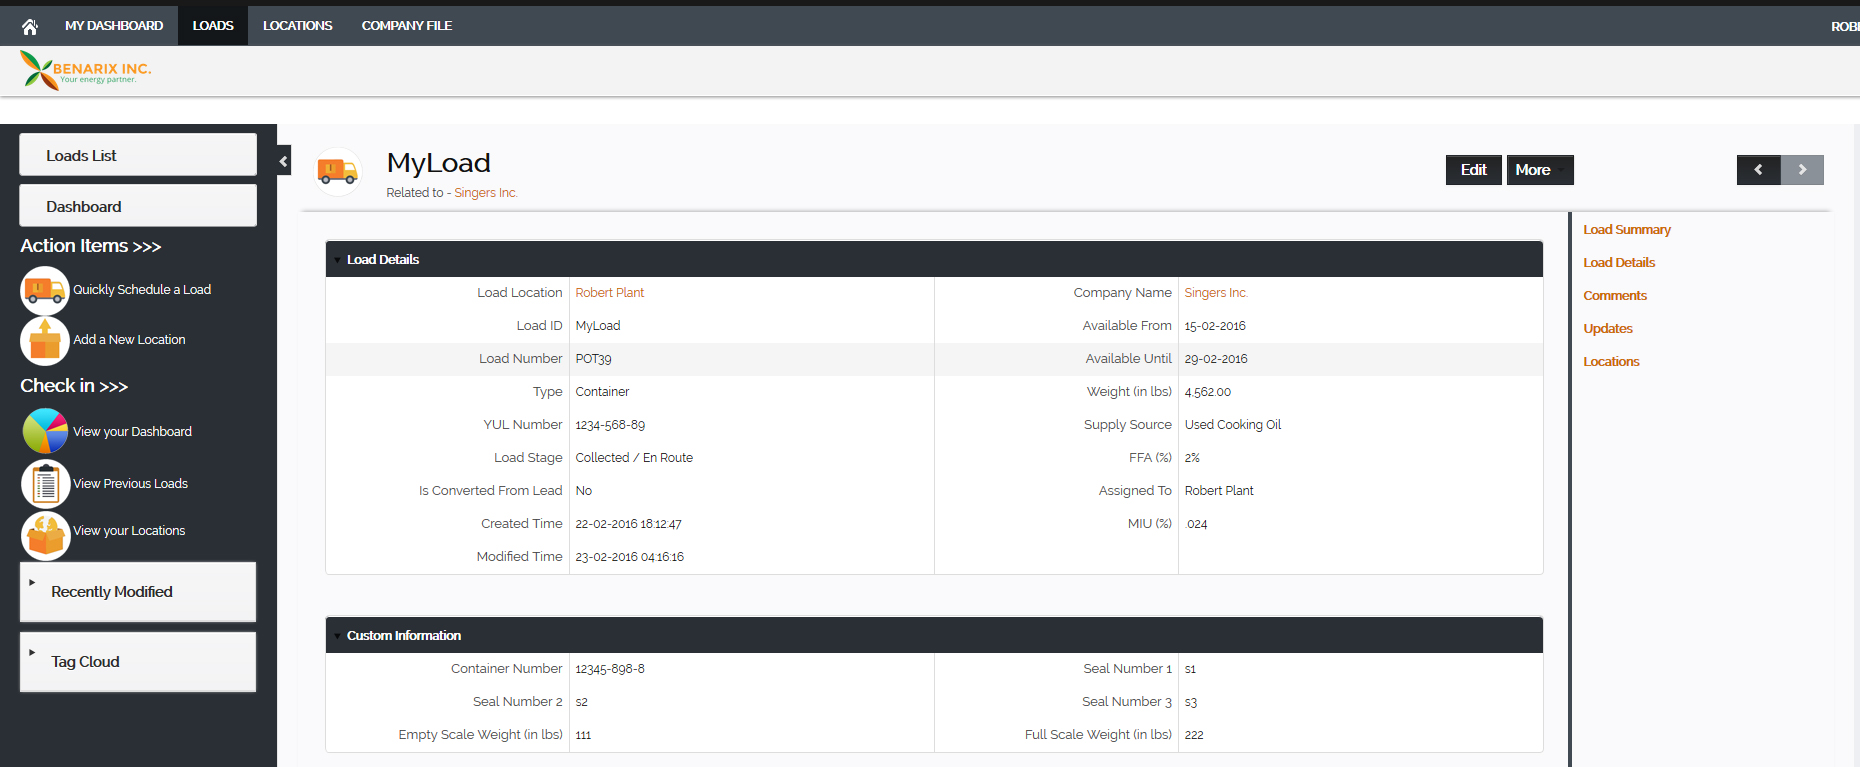
A Load is a supplier-initiated request for a pickup at one of the supplier locations.
A complete Load Request record contains a number of data points that we’ll need in order to schedule the load for you:
- Customer Load ID. (This can be any series of characters you use internally to identify the load.)
- YUL Load Number (optional)
- Load Pick-up Location.
- You may add a new location if you need to. See VI- Adding a Load Location to learn how to add a Load Location to your account.
- Type of Load (ISO Tank or Container)
- “Supply Source” refers to the type of material:
- Used Cooking Oil, Yellow Grease, Beef Tallow, Chicken Fat, Vegetable Oil or Other
- Time window during which the Load will be available for pick-up.
- Estimated load weights. (Precise weights will be entered at the weigh station).
A completed Load record will contain additional information inputted at the appropriate time: Under Custom Information, the following data points will be inserted when available:
- the Container Number
- at least two Seal Numbers for the container.
- the empty scale weight
- the full-scale weight.
VII.1 Loads Home Screen
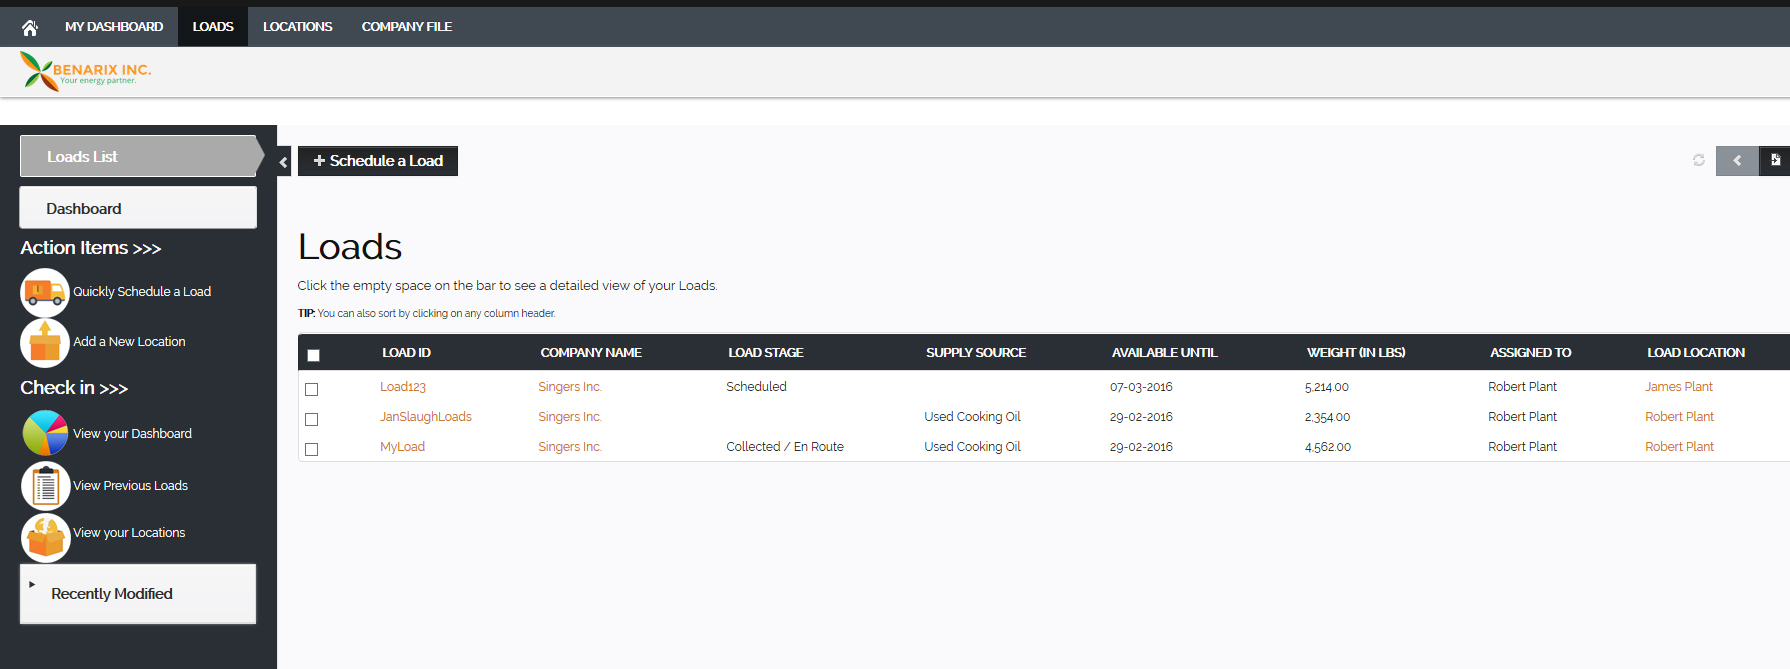
Loads – Home Screen
The Loads home page displays a list of current loads with the latest load at the top. Here you can filter/sort your loads by :
- Load Stage (Scheduled, Collected, Delivered, Cancelled)
- Scheduled Dates
- Locations
- Weights
You can click on any of the previous loads to bring up summary and detailed views of that load. You can also create/schedule a new load (see below) or export your loads into a csv or excel file via your Actions Menu.
VII.2 Load Summary View
The Load Summary Page contains quick top-level information on any load. For a more detailed view, hit the “Show Full Details” button or select “Load Details” from the right-hand menu.

VII.3 Load Detailed View
All and any information on a particular load can be accessed via the Load Detail page. Here you can view and access all the data regarding a particular load, including history, documentation and any changes made to the record.
VIII. Scheduling a Load
Your ISO Tank is filled, your container is loaded… and you’re ready to request your pick-up. Simply follow the instructions below to schedule a pick-up.
You can schedule a load in a number of ways. Via your:
- Quick Action item links
- the “+Schedule a Load Button”
- the “Schedule a Load” link in your Actions Menu
VIII.1 Quick Action Method
- You can access the quick action from your Quick Create Menu:
2. A pop-up window will appear, allowing you to enter the minimum information will need in order to schedule your request for a load pick-up:
- The Load Location
- The Load Availability Window (Start and End dates)
- The Weight of your load
- The FSA and MIU
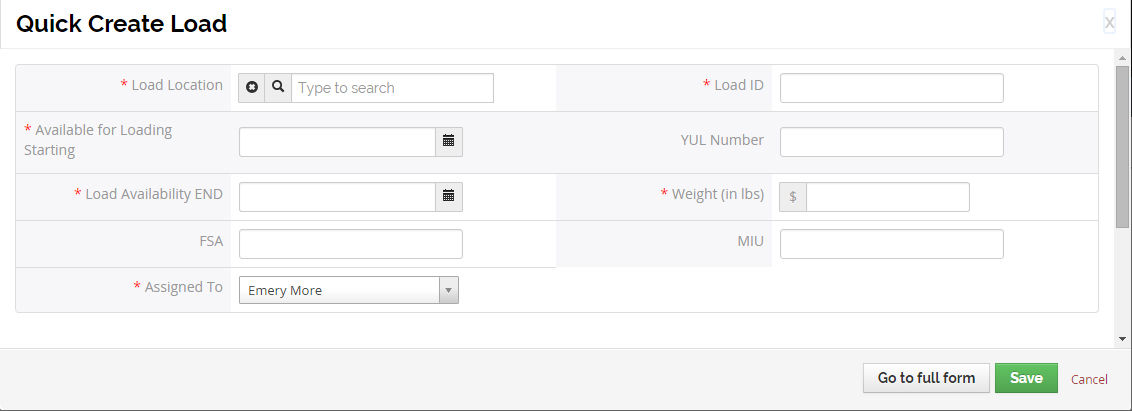
You’ll have an opportunity to fill in further information later, e.g.:
- Empty and full-scale weights
- Seal numbers
- Container numbers
See VIII.2 See Full Record Method to learn more.
VIII.2 Full Record Method
- Sign-in to your customer portal account.
- Select “Loads” from the Top Menu.
- A List of Historical Loads will be presented. Hit the “+Schedule a Load” button at the top of the page. (Next to the “Actions” button)
- OR, Simply click the “SCHEDULE A LOAD” icon in your “Action” menu on your welcome screen:
- You will be redirected to the “Creating a New Load” page.

- Choose your Account from the “Supplier Name” drop-down menu.
- Enter the YUL Load Number if you know; leave it blank otherwise.
- Select the Load Pick-up Location from your list of Load Locations. You may add a new location if you need to.
- Select ISO Tank, Container or Bulk Truck for Type of Load.
- Select the type of material loaded from “Supply Source”.
- Select the window during which the Load will be available for pick-up.
- Enter the estimated load weight. (Precise weights will be entered at the weigh station).
- Under Custom Information, enter any further information you may have at this time:
- the Container Number
- at least two Seal Numbers for the container.
- the empty scale weight
- the full-scale weight.
- When Done, hit “Save”.
- Your Load is now scheduled and you will receive e-mail confirmations and future notifications on the status of your load request.
IX REPORTS & ANALYSES
Coming Soon!